Little Details About Interlocking Pavers That Might Be Useful To You
- September 2, 2015
- Articles

When working on your own house, there are some little details you need to know, so that you can do your own supervision when your contractor is working.
Interlocking pavers are the perfect solution for adding aesthetic appeal to a driveway, patio, or walkway. Interlocking paving stones are four times stronger than poured concrete, flexible, and easy to maintain and repair.
Here is the step by step process which the contractor setting your paving stones should follow:
Required Tools
- Wheel Barrow, Shovels, Picks, Grading Rake (For demo and base preparation)
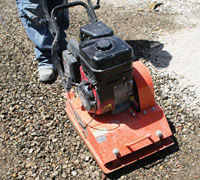
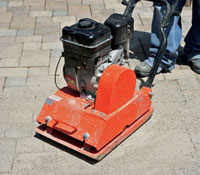
- Vibrating Plate Compactor
- 1inch Pipe and 2”x4” wood (For screeding sand)
- Rubber Mallet (For paver adjustments)
- Masonry saw or splitter (For trimming)
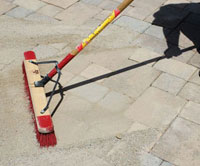
- Broom/brush (For sweeping sand)
Step 1. Planning & Preparing the Base
Begin the planning process by drawing a diagram of the area you want to pave, noting any existing structures such as buildings, fences and other paved areas. Your local paver supplier or dealer can help you determine the best stones and the proper amount of supplies you need.
It is important to provide a well compacted, stable base on which to begin the installation of interlocking pavers. In some cases, this will require extensive excavation of unsuitable sub-grade material.
Compact the Base:
Thickness of Compacted Base: You will want 3- 4inches of compacted base for pedestrian traffic, 4 – 5inches of compacted base for vehicular traffic, and 6- 8inches
of compacted base if large vehicles will be driving over the paver installation.
Fill the excavated site with the appropriate amount of paver base material and compact using a vibrating plate compactor. The base must be well compacted and level to provide a smooth, even surface on which to lay the bedding sand.
Step 2: Sand Bedding
The pavers will be set in a bed of sand. It is this sand bedding that will provide final leveling properties as well as help secure the paver units in place.
Install 1inch of Bedding Sand:
Clean, sharp concrete sand 1inch deep, should be used for the sand bedding.
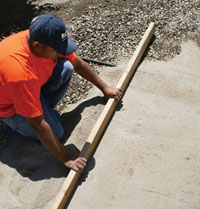
TIP: “Screeding” – In order to get a 1inch depth of bedding sand, use two pieces of 10inch long by 1inch diameter pipe and a 2×4 wood. Lay the pipes parallel to each
other, directly on the base material, and approximately 6inches apart. Loosely spread a layer of bedding sand over these “screed pipe” so that it fills slightly above the top of the pipe. This will avoid compaction before the pavers are laid. Positioning yourself between the pipes. Place a 2×4 wood perpendicular across the screed pipes. Slowly pull the 2×4 wood towards you while sliding the wood right and left in a repetitive motion. This will help to level the sand more accurately. This process will leave a one inch layer of sand. Remove screeding pipes and fill in void with loose sand. Remove any excess sand.
Step 3: Edge Restraint
A stable edge restraint is necessary to eliminate any lateral movement of your pavers and sand bedding. Edge restraints can be either an existing hard edge (such as the side of a house), vinyl molded restraint, or a concrete restraint.
The purpose of edge restraints is to provide a solid barrier to prevent the pavers from rolling or spreading. They should always be used. You can use PVC, aluminum, concrete or pressure-treated wood. Precast concrete curbs are recommended because they are easy to install, are very durable and will accent your paving stone.
Step 4: Laying the Pavers
It is now time to begin laying the pavers onto the bedding sand and fitting them into the desired area of your paver project.
Field and Borders:
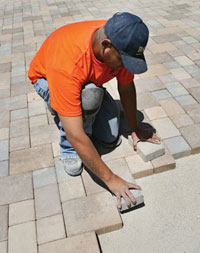
When laying the pavers onto the bedding sand, you want to work in a forward motion. Start the process in either a 90° corner or within the field by using a pre-set string to guide straightness of pavers. Do NOT step on the bedding sand.
Place pavers flat on the sand bed. Do not tilt the pavers into place as this will disturb the level of the bedding sand. When a row or pattern is in place, use them as a guide for subsequent pavers.
Trimming may be required:
As the field moves closer to the edge restraint or concrete border, cutting may be required to fit the pavers to the desired space. Cutting of pavers should be done with a diamond masonry blade and saw or if needed, it can be accomplished using a block splitter.
Step 5: Vibrating the Pavers
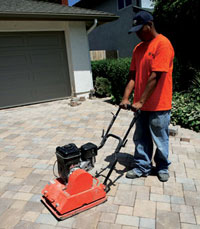
Once the entire paver field and borders have been placed, you will need to run a vibrating plate compactor over the paver project to being the inter-locking process.
Initial Setting and Lock-up:
Rent a vibrating plate compactor. Once the pavers and border have been placed, spread a light layer of sand over the pavers and make a single pass using this plate compactor.
This single pass will help set the pavers into the bedding sand, and cause some sand to move up between the joints of the pavers. This is the initial stage of the “interlock”.
Step 6: Sanding the Pavers
The second step of the interlocking process involves working sand down between the paver joints to achieve final “lock-up”.
Final Compaction and Lock-up
Spread dry paver joint sand over the surface of the paver area. Using the vibrating plate compactor, pass over the sanded pavers to allow sand to properly fill the voids between the pavers.
You will generally need to run the plate compactor over the pavers 2 or 3 times, or until the pavers no longer settle into the sand bedding. This process will achieve final lock-up and completely fill the voids between the pavers.
Sweep the remaining excess dry sand over the surface filling the joints. You will have to repeat this over the next few days as the sand settles and the rain compacts it.
Sweep remaining sand into voids until they are completely filled.
Your paver installation is now complete and ready to seal!
If your contractor has been able to follow these processes or something similar to these, then you are good to go.
Excerpts from rcpblock.com


0 Comments